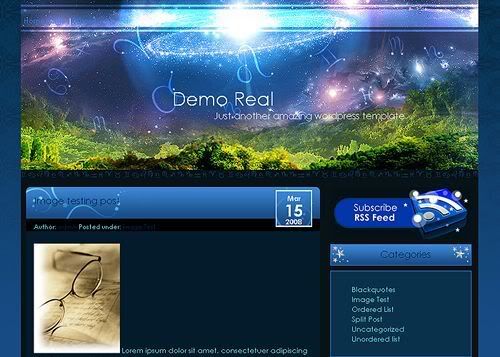
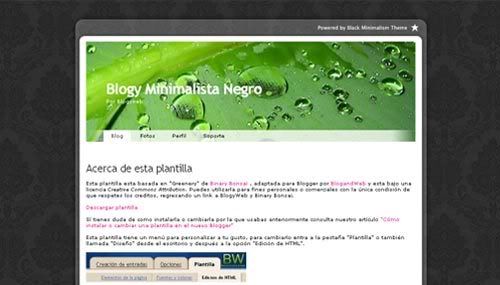
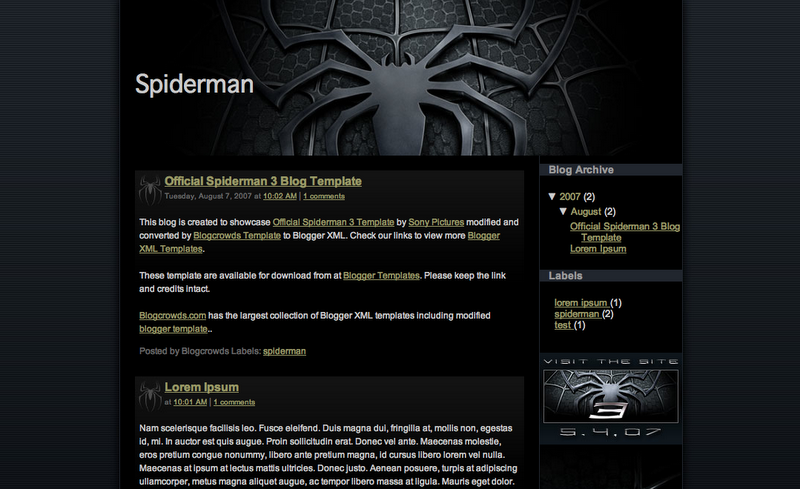
Features included :
* Two columns with right sidebar
* Nice header image
* Built-in RSS feed
This template has 3 columns, with the main content on the left, and same width other columns on the middle and right sidebars. Installing this template is very easy. just upload the xml template to your blogger dashboard like the other template. The only different is that because this template use a large image on the background, you have to host the image on your own googlepages or imageshack.us or any of your own images hosting.
Just follow this simple steps.
- Upload the bg_body.jpg image (it’s in the zip file) to your own image host
- Get the image URL then
- Find this line below inside the XML template file
body {
background-image:url(http://img370.imageshack.us/img370/2730/bgbody2qt6.jpg);
} - now replace the red color with your image URL (step #2)
- Save your template. and done.


1.First,change the navigation links at the top.
 Scroll down the template code and find this piece :
and Change the links and the corresponding text there.
2.Next, change the Rss feed link to yours
Search for this code and change the feed url to yours.
 3.Third one is, if you hav sites like 'make money online etc,.. you can put the advertisers banners in that place.. otherwise, you can put some clickable pictures in that area.
 just look for this code

Download here!
HEADER:
FEEDS:
  /* ----- HEADER ----- */


  #top-wrapper {
  height:150px;
  margin-top:0px;
  background:#fff url(http://img509.imageshack.us/img509/3014/headerdbcpiaab7.jpg) no-repeat;
  margin-bottom: 8px;
  }
<div class='feed'>MENU HORIZONTAL:
<ul id='navigation'>
<li class='feed-blog'><a href='http://feeds.feedburner.com/dicasblogger' title='Assinar via navegador'>Feed</a></li>
<li class='feed-email'><a href='http://www.feedburner.com/fb/a/emailverifySubmit?feedId=1159205' title='Assinar via email'>Feed via email</a></li>
</ul>
</div>
<div class='blue'>SEARCH:
<div id='waxnav'>
<ul>
<li><a class='current' href='http://dicasblogger.blogspot.com/' title='Home'><span>Home</span></a></li>
</ul>
</div>
<div id='busca'>You can replace the code above as your code google adsense for search.
<form action='/search' id='searchthis' method='get' style='display:inline;'><input class='txt_busca' id='search-box' name='q' type='text'/><input id='search-btn' type='submit' value='Buscar'/></form>
</div>
Enjoy...
Wish you success...!

Step by step:
1. First thing you need to do is create your own custom made favicon. You can use Photoshop or Icon Suite to make icon.
Here I've created a icon . Png

Next, Goto your Blogger.com blog and create a new post. It does not matter what you call it since you don’t need to publish it. Once you have created a new post use the image upload button to upload your favicon to your Blogger.com blog.
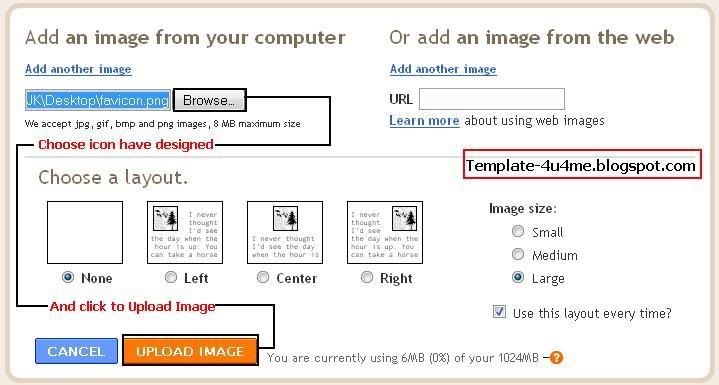
When you have uploaded the image, you will need to switch to “Edit HTML” mode if you are using the “Compose” mode.You will see something like this:
<a onblur="try {parent.deselectBloggerImageGracefully();} catch(e) {}" href="https://blogger.googleusercontent.com/img/b/R29vZ2xl/AVvXsEi5CAuIgZjQuCeuaRIce60rgr-rcMA8kcvVHGRhm1dZ_HiZr8RqsQAGs-1wg9aZe5HwBT_FxviF-1K-y8ApBWC1rZGpHgdGXMJLED3o9kCPqump98mZkr5NneDeJP8XIAzm5ZG07fjdL14/s1600-h/favicon.png"><img style="cursor: pointer; width: 41px; height: 42px;" src="https://blogger.googleusercontent.com/img/b/R29vZ2xl/AVvXsEi5CAuIgZjQuCeuaRIce60rgr-rcMA8kcvVHGRhm1dZ_HiZr8RqsQAGs-1wg9aZe5HwBT_FxviF-1K-y8ApBWC1rZGpHgdGXMJLED3o9kCPqump98mZkr5NneDeJP8XIAzm5ZG07fjdL14/s400/favicon.png" alt="" id="BLOGGER_PHOTO_ID_5283203052390631746" border="0" /></a>You need to highlight and copy the part in quotes right after src=". In this case it would be: https://blogger.googleusercontent.com/img/b/R29vZ2xl/AVvXsEi5CAuIgZjQuCeuaRIce60rgr-rcMA8kcvVHGRhm1dZ_HiZr8RqsQAGs-1wg9aZe5HwBT_FxviF-1K-y8ApBWC1rZGpHgdGXMJLED3o9kCPqump98mZkr5NneDeJP8XIAzm5ZG07fjdL14/s400/favicon.png . You should paste it into Notepad or another text editor. You don’t want to lose this and you will be closing the Blogger.com editing window next.
2. Go to Dashboard - Layout - Edit HTML and find:
</head>Paste the following code on the above:
<link href='images link' rel='shortcut icon'/>, And the code like:
<link href='images link' rel='icon' type='image/png'/>
<link href='images link' rel='shortcut icon'/>3. Now, you must replace 'images link' with the image link was copy in step 1
<link href='images link' rel='icon' type='image/png'/>
</head>
<link href='https://blogger.googleusercontent.com/img/b/R29vZ2xl/AVvXsEi5CAuIgZjQuCeuaRIce60rgr-rcMA8kcvVHGRhm1dZ_HiZr8RqsQAGs-1wg9aZe5HwBT_FxviF-1K-y8ApBWC1rZGpHgdGXMJLED3o9kCPqump98mZkr5NneDeJP8XIAzm5ZG07fjdL14/s400/favicon.png' rel='shortcut icon' />And, finished!
<link href='https://blogger.googleusercontent.com/img/b/R29vZ2xl/AVvXsEi5CAuIgZjQuCeuaRIce60rgr-rcMA8kcvVHGRhm1dZ_HiZr8RqsQAGs-1wg9aZe5HwBT_FxviF-1K-y8ApBWC1rZGpHgdGXMJLED3o9kCPqump98mZkr5NneDeJP8XIAzm5ZG07fjdL14/s400/favicon.png' rel='icon' type='image/png' />
</head>

Wish you success...!
Note: emoticon only appear on blogger after blogger loaded success!
How: Ok, let's go...
Step 1:
You open the Edit HTML in the blog. (Dashboard -> Layout -> Edit HTML )
Step 2:
Find the following code: <head> and add this line below <head>
<script src='http://site.gman.googlepages.com/Emoticon.js ' type='text/javascript'/><body onload='replaceText();'>Continue search:
<b:section class='main' id='main' showaddelement='no'>Edit to:
<b:widget id='Blog1' locked='true' title='Blog Posts' type='Blog'/>
</b:section>
<div id='emoticon'>then save the template. So then it is finished.
<b:section class='main' id='main' showaddelement='yes'>
<b:widget id='Blog1' locked='true' title='Blog Posts' type='Blog'/>
</b:section>
</div> <!-- end emoticon -->
Wish you success!
New Feature in Version 3.0: Use version 3.0 you can optionally be shown 2 types:
1. Show as ver 2.0, meaning Thumbnail Summary on the left and right.
2. Display Thumbnail above (flat margins between) and Summary below, this very beautiful for the collection site and images site.
Demo: my blog
Installation:
Installation is easy and fast, nearly version 2.0 installed.
If you have installed version 2.0, the upgrade conducted as follows:
Search for code format and length of the Thumbnail:
<script type='text/javascript'>Add the following code in the above:
summary_noimg = 430;
summary_img = 340;
img_thumb_height = 100;
img_thumb_width = 120;
</script>
<script src='http://www33.websamba.com/anhvosite/blogger/js/summary-post-v20-test.js' type='text/javascript'/>
var thumbnail_mode = "no-float" ;
summary_noimg = 430;
... http://www33.websamba.com/anhvosite/blogger/js/summary-post-v20-test.jsit is finished.
to
http://www33.websamba.com/anhvosite/blogger/js/summary-post-v30.js
Row
var thumbnail_mode = "no-float" ;is the show's Readmore. Default is no-float: that is displayed in the Thumbnail and Summary below. When you use this mode, the variables and img_thumb_height img_thumb_width will be the largest width and largest height of Thumbnail. If you want to show Thumbnail Summary right and left, the fix-it float to float.
If you have not installed version 2.0 (never installed):
At Template - Edit HTML, Expand widget, to find
<data:post.body/>
and replace it with the following code:
<b:if cond='data:blog.pageType != "item"'>In addition you must also code below into the HEAD (<head> ... </ head>) of the template:
<div expr:id='"summary" + data:post.id'><data:post.body/></div>
<script type='text/javascript'>createSummaryAndThumb("summary<data:post.id/>");</script>
<span class='rmlink' style='float:right'><a expr:href='data:post.url'>Read more...</a></span>
</b:if>
<b:if cond='data:blog.pageType == "item"'><data:post.body/></b:if>
<script type='text/javascript'>With:
var thumbnail_mode = "no-float" ;
summary_noimg = 430;
summary_img = 340;
img_thumb_height = 100;
img_thumb_width = 120;
</script>
- summary_noimg is number of the character description for the items are not representative.
- summary_img is number of the character description for items with the representatives.
- img_thumb_height : height of the avatar (pixels).
- img_thumb_width : width of the avatar (pixels).
Source:vietwebguide.com translated by Joker_H
Sample:
<a href="http://template-4u4me.blogspot.com" title="Free Blogger Template,Turorials,tips">Free Blogger Template For You And For Me</a>If you write code on as normal , it display:
Free Blogger Template For You And For Me
1/ Use sites provide convenient transfer code into text form. http://www.simplebits.com/ - provide tranfer code into text form very easily and quickly.
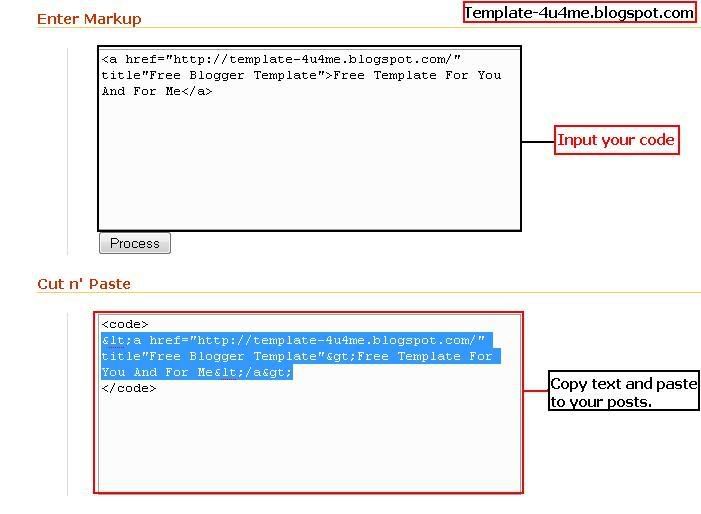
Then you input the code need a tranfer into ENTER Makeup --->And click Process.
Copy the code in the Cut n 'Paste and paste it into your post...Done!
2 / The best way ^^! . Use tag <textarea> code HTML </textarea>.
Copy code into tag and your code will be display.
Demo:
You can optimize tag by adding some attributes:
<textarea rows=x cols =y></textarea>With:
- x : numbers of row
- y : number of column (number of character will be display)
And it look like:
Ok final, wish you success...!
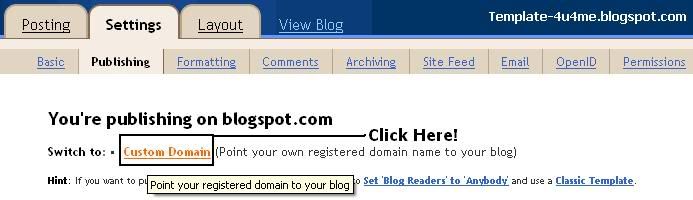
1. Login to your Dashboard, go to Settings --> Publishing and click Custom Domain:
2. You already have a domain. Click Switch to advanced settings

3. Input domain info and click Save settings:

4. Go to the Your Domain control panel and edit DNS Name server :
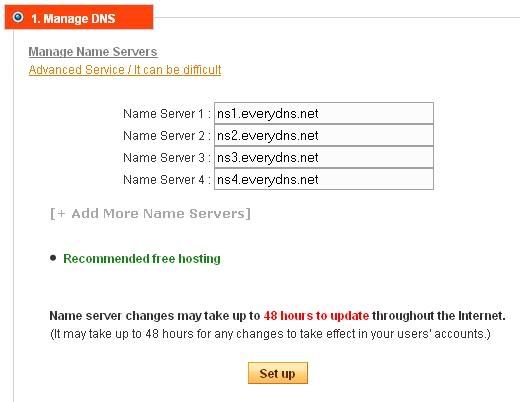
5. Go to everydns.net and login (if you don't have account you can register very easily). Enter the domain name into Add new basic domain and click to Basic button
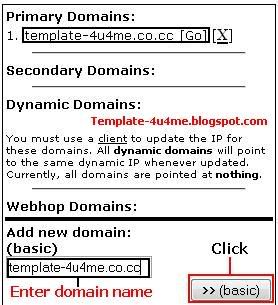
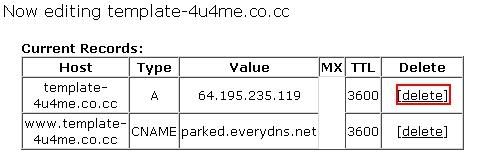
6. Click to domain name has been added, in the Current Records will appear as two records CNAME and A with the parameters of default. Your job is to remove items to A by clicking on the Delete button on your right.
At the Add a Record: www you fill in the box Full Qualified Domain Name, Record Type box select value is CNAME, and cell Record Value fill the ghs.google.com
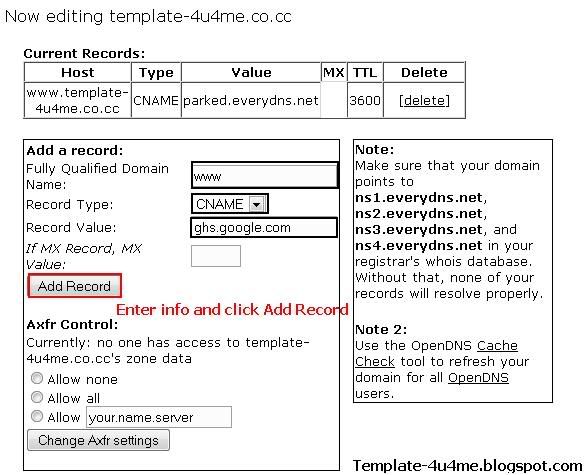
If successful, it will be like the following:

You mission is waiting to DNS update....and Done!
Note: If you have domain you can go to domain control panel and edit dns name server : ghs
Wish you success...!

